Posts

Showing posts from 2016

Install Octave with GUI on remote machine

I used a VM provided by lab, to run octave scripts since RTI require computation and time. This is a step by step command list of how to install octave and run on a remote machine. ssh -X username@ip                            --> login to remote machine, note the '-X' apt-get install octave                           -->  Install octave in remote machine sudo apt-get install octave-statistics     --> Install octave statistics package sudo apt-get install octave-communications --> Install octave statistics package pkg list                                                  -->   to vie w the pa c kages installed. If installed the above two packages will appear. pkg list  octave --force-gui                   -->   to use the gui, this is only possible if you use '-X' option when login Transfer files using scp command. Now you can run octave scripts on remote machine :) Using below link, you can find h/w information of the remote machine.

Tikhonov Regularization on Radio Tomography Imaging

Image
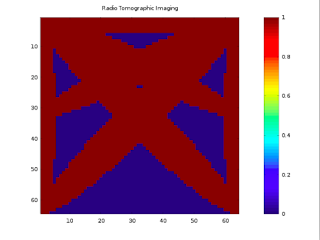
Without waiting for a long progress I just thought of writing this small article as I'm proceeding with research on Radio Tomography Imaging. Patwari et al have given a regularization method "Tikhonov Regularization." With help from my supervisor to understand this operator, I came up with the following image which is a plot to identify a static human at location 9,9. The parameters width of the ellipse and pixel width are different to original author specifications, but the regularization parameter is the same. The code is found here , which I'm still in progress to develop.  Please feel free to point out any mistake. Thanks!

Create a WiFi hotspot manually in ubuntu laptop

This is a small post about creating a WiFi hotspot in ubuntu, using default network manager. Even if you don’t have a wireless Internet connection available to share, you can network computers together and communicate between them (share files etc.) by turning your laptop to a Hotspot/ Wireless Access Point. 1. Disable WiFi if it is enabled. (If you want to use internet, connect an internet cable ) 2. Go to Network Icon and select Edit Connections . Select Add button inthe window. 3. In the "Choose a connection" window, select Wi-Fi . 4. In the "Editing wifi-hotspot" window, type a connection name, SSID and select Infrastructure as Mode and select your wireless card as MAC address . 5. You can set your password if you want in the " Wi-Fi Security " tab. 6. In the "IPv4" tab, select Shared to other computers . Save the settings. 7. Now you can see a file with the connection name you gave, at /etc/NetworkManager/system-connecti

Weight Model for Radio Tomography Imaging

Image
For the past couple of weeks I was working on my research Octave backend scripts. I was struggling to draw an ellipse model, and after wasting time I figured out it was an error in Ocatve installation packages. The statistics package. So after manually calculating the euclidean distance, the weight model was plotted easily. This is a sample code for anyone to refer. Below are some images of the dynamically plotted model. This model was suggested by Patwari et al from University of Utah. The initial code I refered to is taken from my co-supervisor, Mr.Asanka Sayakkara. Completed ellipses for six nodes at locations.

A web server in C- with PHP support

My previous post was a brief introduction to a web server and a python implementation of a simple web server. However the implementation of a web server in C is not as easy as python, but with few lines of code, you can implement a simple web server! Here is my code of a webserver that supports PHP. It accepts different file types including PHP, and serves the files to the client. https://github.com/Dilu9218/MyWork/blob/master/trywebserver.c Below is an alternative simple non descriptive code which works fine in port 8000. https://github.com/Dilu9218/MyWork/blob/master/webserver.c

Implemeting a basic Web Server

Image
What is a web server? Web server is a networking server that sits on a physical server waiting for client requests. The Web server creates a listening socket and starts accepting new connections in a loop. The client initiates a TCP connection and, after successfully establishing it, the client sends an HTTP request to the server and the server responds with an HTTP response that gets displayed to the user. To establish a TCP connection both clients and servers use sockets . Sockets A good understanding of sockets can be gained from reference [1] link. Simply, client sockets can be used to send and receive data, where as server sockets are used to create a client socket. In this case, the socket is bound to port 8888, and host=“ ” specifies that the socket is reachable by any address the machine happens to have.    Since low numbers are reserved for well knows ports (like 80 for HTTP), I used a high number (8888). The socket is destro

Why so few women in computing? A literature Review

Why So Few Women in Computing?: A Literature Review. M.A.D.G.Piumwardane Introduction The number of women in science and engineering is growing, yet men continue to outnumber women, especially at the upper levels of these professionals. Though the high school numbers are roughly equal, by graduation, men outnumber women in computer science. Only 20 percent of bachelor’s degrees are earned by women.[3] Only 60 percent would attempt to get to the industry considering the conditions and from those joined, 40 percent of women leave the IT industry completely.[2] Women leaders are fewer. Trade journals and academic research have confirmed that women in IT fields are concentrated at the lower and middle levels and are under-represented at the higher levels.[2] This review is a brief summary of the recognized causes affecting this issue and mostly highlighted suggestions to improve the situation. Early in the pipeline At very young ages schoolgirls become familiar with male-dominated

Getting started with Programming ESP8266- ESP07 modules

Image
 Recently I had to use esp8266 modules to do my research on wifi radio tomography. To program them was a challenge because of my lack of knowledge in electronics. It was very new to me and I got a huge support from my research supervisor and research lab friends to do this. Below are the steps I followed and reference I used to understand and program.   Specifications: Linux Ubuntu version 14.04 Arduino 1.6.8 Steps to follow: 1. Download and install Arduino To install and start with Arduino on linux, this is good link->  arduino 2. Start the arduino IDE. Open 'preferences' from file menu. Enter this text/link in the field -> http://arduino.esp8266.com/stable/package_esp8266com_index.json 3. Open 'board manager' from Tools->Board menu and search for esp8266 platform. Install it. 4. Select "Generic ESP8266 Module" from Tools-> Board, and select the following settings. Flash Frequency: 40MHz CPU Frequency: 80MHz U

Radio Tomography Imaging

Image
Since I conduct research on tomography area, I thought writing a small article as an introduction to many who does not know about this. Radio Tomography Imaging (RTI) is a technique used to generate 2D images of the change in the electro-magnetic field inside the area covered by the radio transceivers to spot the presence and movements of animates (e.g., people, large animals) or large metallic objects (e.g., cars). Below are some graphs of the basic experiments I conducted to see this effect. I have plotted two plots per graph. Clear Line of  Sight (LOS) and a man standing in the middle(LOS) disturbing the link which allows us to see the difference clearly. Plot is for a single link, using many distances. Plotted graphs using matplotlib. Here is the link for the code.

Using SCP command to transfer folder from local machine to remote machine

We use SCP command to transfer/copy files/folders to remote machine to a specified location, in the following way. Execute the commands from your local machine. Copy a file: [dilushi@debian ~]$ scp examplefile yourusername@server:/home/yourusername/ Copy the whole directory, use -r option: [dilushi@debian ~]$ scp -r directoryname yourusername@server:/home/yourusername/ . Reference

How to solve ValueError: bad marshal data when importing matplotlib

 This error occurred when I was trying to run a .py to plot my graphs using matplotlib for the research. I was able to plot graphs well before this happened. However it wasted my precious few hours dedicated to research work so I want to spare your time and thought of writing how I solved... When I googled the error it said that it was an error in .pyc files but was not specific. I tried the given solutions like reinstalling python. (not reinstalling OS which was given as solution too since uninstalling python would cause OS errors) The method I tried to remove .pyc files -> here The error again was -> Traceback (most recent call last):   File "2m.py", line 2, in <module>     import matplotlib.pyplot as plt   File "/usr/lib/pymodules/python2.7/matplotlib/__init__.py", line 123, in <module>     import pyparsing ValueError: bad marshal data (string ref out of range) Then I tried installing pyparsing which was already installed. So I uni

Translating Wikipedia Pages to Sinhala

Towards the end of the internship as our lab celebrated its 10 th anniversary, there was a suggestion to start translation of English wikipedia pages to Sinhala, the commonly used language in Sri Lanka. This would be a great help to break the language barrier of young new comers who like to learn technology. Here are the simple steps to start translation. Create an account in wikipedia ( Create Account ) Then you can log in and start  (Get Started ) From Beta features , you can select "Content Translation" Select a page you want to translate from here . Select an input keyboard. (I used the singlish keyboard and the Wijesekara key board) After translating, publish your translated article. This was a very interesting activity to me, since the article I started with required a lot of thinking of real meaning to translate. We also get support from the Natural Language Processing lab in our university. I hope to do this often as a hobby to open gate

Wiritng Research Papers using LaTeX & Subversion (SVN)

Towards the end of our internship period we started writing research papers based on our work. We used LaTeX to write. LaTeX Use this command to install LaTeX, sudo apt-get install texlive-full Then download a template and go to the relevant folder and type ' make ' and enter. This will run the Makefile. The .pdf file will automatically get generated based on the .tex. The .tex can be edited with 'gedit .tex' or 'gedit .tex &' SVN Apache Subversion (often abbreviated SVN , after the command name svn ) is a software versioning and revision control system distributed as free software under the Apache License. We use Subversion to maintain current and historical versions of files.  To install svn, sudo apt-get install subversion Then choose the location, eg: cd home To get the current version of the repo,by login to server, svn co svn+ssh:// uname@192.248.22. 131/var/svn/name/ Editing of files can be done with following tw

More experiments with GSM- locate BTS

While working to identify the frequency my android phone uses, here are some important links and apps I came across. This is an app I used to find out the LAC (Location Area Code) and CID() https://github.com/SecUpwN/Android-IMSI-Catcher-Detector The following information and more can be taken form the above app: MCC — a Mobile Country Code. This code identifies the country. Sri Lanka- 413 MNC - a Mobile Network Code. This code identifies the mobile operator. eg: Dialog-2, CellTel(Etisalat)-3 LAC - Location Area Code is a unique number of current location area. A location area is a set of base stations that are grouped together to optimize signalling. eg: 20126, 3003 CellID (CID) — is a generally unique number used to identify each Base transceiver station (BTS) or sector of a BTS within a Location area code. eg: 1702739, This is the link I used to find how to track the BTS with Cell ID and LAC: http://cellidfinder.com/articles/how-to-find-cellid-location-with-mcc

Create folders and give permission in Remote Virtual Machine

This article has some useful commands I came across while doing the research lab work. To remotely login into a virtual machine,  creating a user group, and giving permission to the group to access that folder. This is done by changing the group ownership of the directory. Remotely log in to the virtual machine ssh username@[ip] Login from user account and goto the root terminal. su root Creating a group sudo addgroup groupname Creating a user into this group sudo adduser username groupname View all groups groups cat etc/group Change owner and group of a file or directory chown {-R} [user]{:group} [file|directory] Change folder permission only of a group(not user) chgrp {-R} [group] [file|directory] Change permission(read write execute of directory ProjectData to the group and user) cat /etc/group chmod 770 ProjectData

Sniffing GSM traffic with hackRF

Image
This post is realted to my previous post , where the tools that should be pre installed are mentioned. Gqrx which is preinstalled in the live DVD can be used to visualize the frequencies. Here are examples of gqrx  tuned to different frequencies observed from channels captured from hackrf_kalibrate. (see my earlier post) Tuned to frequency 950.8MHz. Tuned to 959.6MHz. Then we need to run the grc script airprobe_rtlsdr.grc which is located at gr-gsm/apps folder found in the pre installed gr-gsm. Here is a screen shot of the flowgraph. I set the default value of gain to 40, which increases the packets captured from wireshark which is later explained. Here is a screen shot when I run the flow graph. Then we have to run wireshark from another terminal. Interface is loopback interface (lo). Use the following command, which runs wireshark as root user with icmp and gsmtap filters. sudo wireshark -k -Y 'gsmtap && !icmp' -i lo Here is a sc

Install Requirements for GSM band observation with hackRF

Image
The GNURadio version used for this is 3.7.9. I used the live DVD image which can be downloaded from here. The extra tools needed are : hackrf_kalibrate gr-gsm gqrx  wireshark (gqrx was preinstalled in the GNURadio image). This is how I installed the other three tools. Installing gr-gsm ,  GnuRadio blocks which is used to decode GSM packets . sudo apt-get install git cmake libboost-all-dev libcppunit-dev swig doxygen liblog4cpp5-dev python-scipy git clone https://github.com/ptrkrysik/gr-gsm.git cd gr-gsm mkdir build cd build cmake .. make sudo make install sudo ldconfig I had the error "package 'libosmocore' not found", so I had to manually install that package using the commands provided in this site. cd libosmocore/ autoreconf -i ./configure make sudo make install sudo ldconfig -i cd .. And during the configuration  "No package 'talloc' found" error occurred and I had to download and install it manually with this link.